Friday 4 March 2011

Final Idea for GF Smith Poster

I think this poster layout works really well. I like that the text follows the jagged shape of the model and it looks more eyecatching rather than the text being in a straight line. The only thing I may change is the size of the lettering.
This poster fits into the theme of 100 years as the link chain of models represents a time line.
And of course to match the brief the poster will be potrait. This will look effective as the words will look like they are climbing the models. And makes it a lot more interesting visually to look at rather than the text just being placed in a straight line across the the poster.

Ideas for Poster Layout

I think the font I have chosen (Century Gothic) works well with the poster and looks simple and not too complex. However, the straight layouts of the information doesn't work well with the model so I will play about with changing the positioning of the words.


I will not be able to use these layouts though as the poster needs to be potrait. If I turned the image upright and made the text flow upwards following the shape of the models I think that would look effective and would stand out.

Tuesday 1 March 2011

Photos to use for my Final Poster

For my final poster I will use one of these photos and add the text to it by using photoshop.


With this photo the text would be able to go above and below the chain of models.


With this photo I would be able to put the text below the chain model.


And with this image the text would go above the chain model.


I think this is the most successful picture and I will use this for my final poster design. I will be able to put the text either above or below the chain model.

Monday 28 February 2011

Poster Ideas and Poster Research

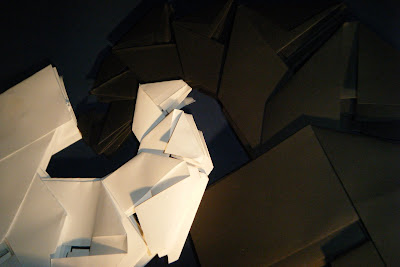
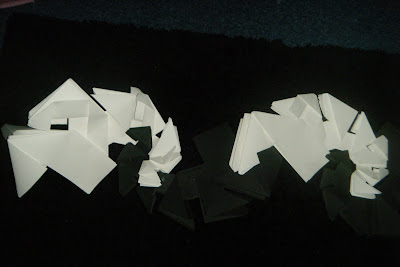
For my poster I have decided to just use black and white and no bright colours. I want the main focus of the poster to be the paper models and for the viewer to focus on the shape of the models and not the colour of them. The text will also be in black and white and will be bold and simple. The text should stand out but it shouldn't be the main focus of the poster. I want the text to work with the model. For example I may make the text follow the curved shape that the chain of models creates.

 Poster Research

Google Images: Last accessed 6th March 2011 at: http://www.disassociated.com/images/posts/graphic_design_winner.jpg
 
I like this poster design as the main focus of the poster is the colours used and the different directions of lines. All the colours make the poster look very busy, whereas the font is very simple and plain to look at. All the lines are on a diagnol, also the writing is on a diagnol.

Google Images: Last accessed 6th March 2011 at: http://behance.vo.llnwd.net/profiles/54456/projects/82938/544561207048208.jpg
 
I like the font in this poster as it uses different thicknesses and some of the letters overlap. Making some words bold puts more emphasis on that word and draws the audiences attention. There is also a lot of space left on the poster as the image is just centred and the text placed beside it.

Google Images: Last accessec 6th March 2011 at: http://www.liamjaydesigns.com/blog/wp-content/blog_uploads/2010/04/saulbass.jpg
 
This poster is kept very simple and the main focus on this poster is the text. The text is simple and stands out againts the red background. It is also placed horizontally.

Google Images: Last accessed 6th March 2011 at: http://fc02.deviantart.net/fs71/i/2010/097/3/4/Graphic_Design_Poster_by_cube1987.jpg
 
Again I like this poster as the text is placed diagnally across the poster which makes it more eye catching and interesting to look at than if it had been placed horizontally.
Google Images: Last accessed 6th March 2011 at: http://farm3.static.flickr.com/2326/2252547555_018206a805.jpg
 
The text on this poster catches my eye as the words are different sizes and again different thicknesses.  I think this looks very effective.

Google Images: Last accessed 6th March 2011 at: http://www.jeetheman.com/files/gimgs/19_poster-1web-2.jpg
 
This poster caught my eye as I like the way the images interact with the text and cover up parts of the words. The colours also make the poster stand out. Also the simple font works well with the complex drawings.
 
Google Images: Last accessed 6th March 2011 at: http://www.elbowroomdesign.com/musings/wp-content/uploads/2009/02/james_chance_poster.jpg
 
The image of a saxophone is used to creat the "J" and the same font has been used however the sizes and colours of the font have been changed. It changes from yellow to orange to red which works really well. The text is the main focus of the poster and is again placed on a slant. Most of the text is on a slight slant however some of the text is on a steeper slant and the rest of the text is arranged next to it.

Reflection

Looking at these poster designs has given me some ideas for my poster layout. Instead of simply putting text in a straight line I would like to try and put words on diagonals. Also it has made me think about the look of the font. Not all the letters have to be the same size or same thickness.


Ideas for Poster Layouts


The text for the poster could be positioned above the paper models...


Here the text could be placed to the right hand side of the paper models...


The text can also be placed below the models...


The text can be placed above and below the models and they would follow the curved shape the models create...


The text can be placed in the middle of the circle with the models surrounding it...


These 2 models together look quite like an "S" so the models could be used to make the "S's"  in the poster text...


The model here goes out into the distance, I could make the text do the same thing.


I have used light in these photos to create shadows.


Without any shadows the models look completely different.

I have taken pictures of the models hung off of eachother and see what good angles I can get.


However I have decided not to hang the models off of eachother, althought it does give good angles of the models and shows lots of shadows, I think it is too similar to task 1 where my models were hanging off the atrium banister. To change my idea for task 2 I will photograph the models layed down and hooked together in a linked chain. Also I have made more models to go with the originals and hanging them all off eachother would not be possible as the models may bend from the weight.


Thursday 17 February 2011

Task 2 Poster Campaign- Developing Model Continued


The models fit nicely together in a linked chain.


The models can also make a spiral pattern.

Tuesday 15 February 2011

Task 2 Poster Campaign- Developing Model

For the campaign poster I will uses the model I made in Task 1. I have decided to make it bigger and make many of the models to link together to form a chain which is what inspired my model.


I have arranged  2 of the models in different positions to see which would be best to link them in a chain.


I have decided this would be the best way to link the models as it gives a nice pattern.


If I put the models side by side like this it would look more like a domino line and I would not be able to link the models together in a chain.